How to. . . |
| Register |
|
- Go to the EZBeanZ© login screen found at www.EZBeanZ.co.za and click on register.
All new users are issued with FREE BRONZE licenses. You may upgrade your license at a later stage if you would like to benefit from the additional features available.
- Next, you will be directed to a form where you will be asked to provide your details. Note that NOT ALL of this information is required. However, we recommend providing as much information as possible. If you do not own a business, you are still welcome to use EZBeanZ as a private individual. You may use any name as the business name, provided that it is not already in use.
- You may also provide a logo if you have one. This logo will appear on the PDF invoices that you create for your customers, as well as their statements etc.
- After completing this form, you will be sent a verification code. Check your email inbox, this can take a few minutes. Please do not close the registration page while you are waiting for the validation code!
- Once you have received the validation code, enter it on the validation form and proceed.
- All done!
You will then be directed to the log-in screen where you will be shown your unique username eg: AQBZE5
This username along with the password that you provided are your login details.
- Try it out. . . When you log in, you will arrive at your dashboard where you will be able to add customers, create invoices, edit inventory, view accounts and much more.
|
| Login |
|
Using your Smartphone or PC, Go to the EZBeanZ© login screen found at www.EZBeanZ.co.za to login.
When logging in, be sure to use YOUR Username and Password. Note that your company also has a username, however, the Company Username is not used for logging in.
If you have lost your login details, please email support at admin@EZBeanZ.co.za
|
| Create a new invoice or quotation |
|
Watch on YouTube
- Click/tap on the Invoices and Quotations tab.
- Select Invoice or Quotation from the dropdown.
- Select a customer from the dropdown. If this is a C.O.D. sale, it is not necessary to add the customer first. Simply select C.O.D. Unknown.
- Items can be added to the invoice in several ways:
1. Click on Inventory and then click/tap on the description of the item. Clicking again will add more of the item.
2. Click on Load Template. This will load items from a template which you have saved for this customer.
3. Click on Scan Barcodes. Your device camera will switch on and you can then scan the barcode of the item. Make sure you have already added the barcode in your inventory if you intend to use this feature.
4. Manually type in the description, quantity and price on the invoice form.
- If you are creating a quotation, at this stage you can click or tap on Issue Quotation. The following step, regarding the payment method, does not apply.
- Select Payment Method (if this is an invoice):
Below the invoice items, you will need to enter the details for payment.
If the customer has an account with sufficient credit. Payment is not required immediately in order to issue the invoice. Simply click on Issue Invoice.
If the customer does not have credit, they are required to pay before the invoice is issued. You may enter the cash amount being paid and/or click on a card payment option in order to process a card payment.
-
After the invoice or quotation is created, it will automatically be sent to the email address provided for that customer. If you have a printer, the invoice will be printed automatically.
Printing can be enabled/disabled in the settings.
-
If the customer owes an amount, the invoice and statement will contain a SCAN TO PAY QR code as well as a clickable link allowing the customer to pay online. Please make sure you have set up your preferred payment gateway in the Settings tab in order to make use of this feature.
The invoice will automatically be sent to the email address provided for that customer.
If you have a printer, the invoice will be printed automatically. Printing can be enabled/disabled in the settings.
|
| Use live order tracking |
|
Watch on YouTube
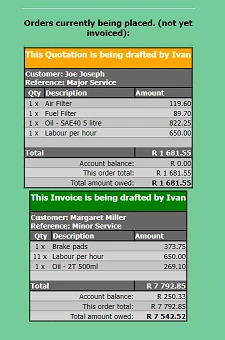
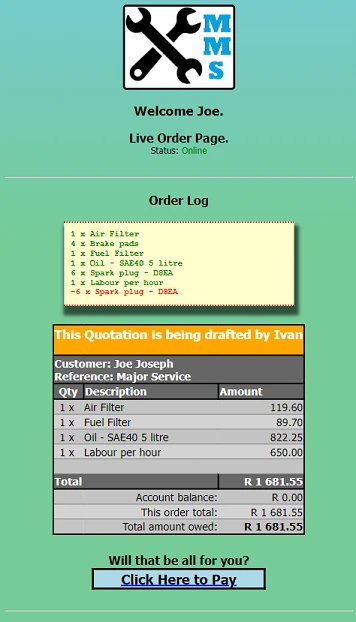
Live order tracking provides a screen where the customer, the staff and the owner can monitor an order while it is being created and dispatched. This can be viewed on a mobile phone or displayed on a big screen. This also allows the customer to make payment online. It can be accessed by sharing the order tracking QR code or tracking link with the customer. There is also a screen which displays all of the orders that are being placed. This is mostly intended for the warehouse or the kitchen and also for the owner or manager to monitor sales.
To make use of live order tracking, follow these steps:
- Under Settings, scroll to Order Tracking
- Enable Basic Order Tracking.
- Enable Live Order Tracking. This provides real-time updates to the order tracking screen. Each time an item is added to an invoice or quotation.
- If required, enable Print Live Order List 58mm. If enabled, your thermal slip printer will print a line showing the item being ordered and by which customer. Printing occurs real-time. This feature is for situations where fast preparation is required such as in a restaurant. The kitchen is immediately informed as the customer is placing the order and the customer can view the order being prepared. This way, the waiter can move on to the next customer without having to physically write down the order and give it to the kitchen.
- Now that this has been enabled, click on Save Settings. You will now notice a QR code on the dashboard. You may scan this or follow the link with any device to get to the order tracking screen for all orders.
- Now go to the Customers tab and click or tap on edit next to a customer who is placing an order. You will see a QR code and link for order tracking. The link you see is for that particular customer only. Not all of the customers.
- You may allow the customer to scan this QR code or share it via WhatsApp or email. From then on, the customer can view and pay for their orders on their phone.
|
| Create a monthly or weekly scheduled invoice |
|
Watch on YouTube
With EZBeanZ, you can setup an invoice to be sent at regular intervals. ie. Once per week or once per month on a particular day. To use this feature, the following checks should be made:
- The customer must be in your database. Check in the Customers tab to make sure. It is important to provide an email address for the customer, or else the customer will not receive the invoice.
.
- The customer must have a template. This is a saved list of items which will be used to create the invoice. To check if the customer has a template, go to the Invoice tab select the customer, and click on Load Template. If you see items appear, those are the items which will be on the invoice. If there are no items, add the intended items to the invoice and click Save Template.
Now you are ready to schedule the invoice. These are the steps required. . .
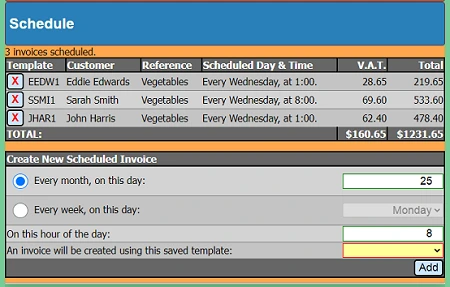
- Click on the Schedule tab.
- Select whether the invoice will be sent once per month or once per week
- Choose the day on which the invoice must be sent. eg: On the 25th or every Monday. It is not possible to select the 29th, 30th, or 31st because some months do not contain those dates.
- Choose the hour at which the invoice must be sent. The default is 8:00AM
- Select the customer to be invoiced. If the customer does not appear on the list, refer back to the checks mentioned above with regards to adding the customer and the template. Another possible reason is because you have already created a schedule for that customer.
- Click on the Add button.
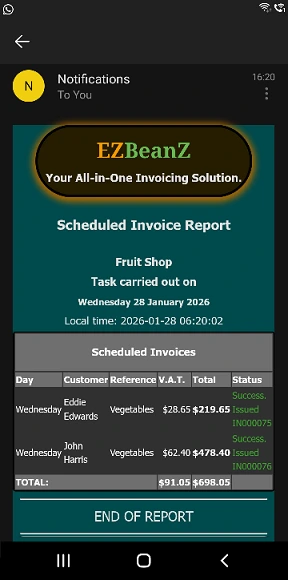
Now the item will appear in the Schedule table. Starting on that day, an invoice will be sent to that customer. The invoice will be repeated every time that day comes, at the same time of day. You, as the business owner, will receive a report by email with a list of invoices that were created and sent automatically.
Below is an example of a report email to the owner.
|
| Setup payment methods |
EZBeanZ provides your customers with many ways to pay you.
-
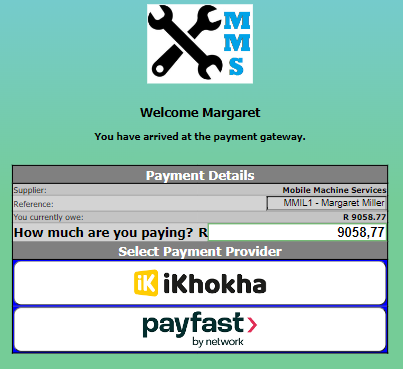
Payment Gateways - Once configured. You will find a green button on the invoice screen representing the payment gateways which are available. C.O.D. Customers can be charged by providing their card details.
To use this feature, click/tap on the button representing the payment gateway. For this feature to be enabled. Go to the Settings tab and locate the Payment Gateway settings. Further instructions are provided there on how to setup your preferred payment gateway.
-
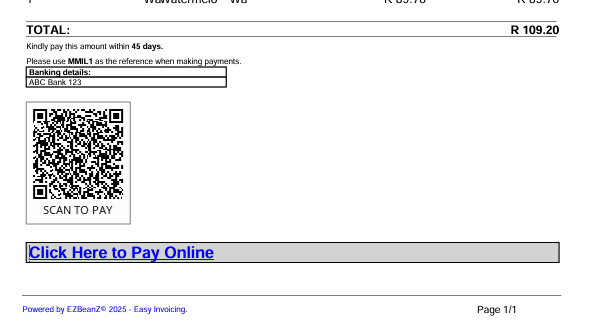
Scan QR code to pay - Invoices and statements each contain a QR code which can be scanned in order to make payment. When the QR code is scanned, EZBeanZ recalculates the account balance to include all other invoices which are not yet paid before and after that invoice was issued.
Thus encouraging the customer to pay all outstanding amounts. The QR codes do not expire and remain valid for all past and future account payments for that particular customer. Note that the QR codes only appear on invoices which require payment. If the invoice was paid in advance, the QR code will be omitted.
On statements and invoices. . .
-
Clickable links - Similar to scanning the QR code, the clickable payment link is a button which appears on invoices and also in emails when you send statements to customers.
-
Card payment using a standalone card reader - This is when a separate payment device is used to receive the
payment. Such as a portable card reader supplied by your bank. This option sometimes includes using a separate card
payment application.
-
Cash - The amount paid by the customer is entered on the invoicing screen. The invoice will contain a stamp indicating that cash was paid. The stamp displays the amount paid and the change given back. Customers can also make split payments with a portion paid in cash and the balance by card. EZBeanZ can integrate with a printer and an electronic cash drawer using our proprietary P.O.S. printer driver.
All major credit and debit cards are accepted as well as instant EFT and several other options.
In the settings tab you can nominate 2 payment providers. We recommend setting up at least one. If you have nominated 2 payment providers, your customers will be given a choice of using either.
When a payment is made by a customer, the payment provider sends a response to the EZBeanZ server. If the transaction was successful, an entry is automatically made into your Accounts table and the account of that customer is then credited by the amount paid. The customer can scan the same QR code again, the new account balance will reflect.
|
| Use templates |
An invoice template is a saved invoice which can be used later to create a real invoice.
Templates can be viewed and used at any time. You may add or remove items from a template until you are ready to issue the actual invoice.
This can be used as a shortcut if a customer regularly purchases the same items. Templates are also used when sending a batch of invoices to many customers. To create a template. . .
-
Follow the steps to create a new invoice but DO NOT CLICK ISSUE INVOICE!
-
Click/tap on Save Template. The items on the invoice will be saved onto the name of the customer that you have selected. But no invoice will be issued or sent to the customer.
-
Later, when you are ready to send the invoice, go to the invoices tab, select the customer, and click on Load Template. This will bring up the invoice items that you previously saved.
Each customer has a template. By editing the invoice and clicking on save, the template will be overwritten.
Wildcards (advanced users)
A wildcard is a special word which can be used on an invoice in the reference or description fields.
When the invoice is issued, the word will be replaced with a calculated phrase.
eg. If you provide the following reference or description:
Membership Fee NEXT MONTH
The words NEXT MONTH will be replaced with the name of next month May
And the words will appear on the invoice as:
Membership Fee May
This is particularly useful for businesses which issue invoices for the same items on a monthly basis (see also: Send a batch of invoices).
Each new invoice will contain the actual name of the month which changes each time.
Supported Wildcards:
| Wildcard | Result |
|---|
| LAST MONTH | March |
| THIS MONTH | April |
| NEXT MONTH | May |
Note:Wildcards are case sensitive.
|
| Add customers |
Watch on YouTube
-
Go to the Customers tab. Here, you will find a list of your customers. If you have not added any customers, you will see only one customer listed. Namely: C.O.D. - Unknown Customer.
This represents all anonymous customers and can be used when creating invoices if the customer details are not known. This customer cannot be edited or deleted.
-
Click/tap on Add New Customer. You will see a form with space to fill in the customer's details. The minimum required information is the first name of the customer. It is not necessary to include all of the customer's details. However, it is recommended to add an email address. This is used to send invoices and statements to the customer.
-
Credit limit - If the customer must pay upfront, set this amount to 0. Then you will not be able to issue invoices to the customer without a payment being made. This customer will need to pay before the invoice can be issued. This can also be set to a negative amount, such as for businesses that require their customers to maintain a minimum available balance.
If you want to create the invoice first and then ask the customer to pay when they receive the invoice, set this amount to a suitable maximum. Please be cautious when delivering your goods or services to a customer, if the account has not been settled first. If the amount owed by this customer has reached the limit, you will not be able to issue another invoice to the customer until a payment has been made.
-
Settlement period - If this is set to 0. The customer must pay invoices on the same day. If you are giving the customer a period of time to settle invoices, set this to a number of days eg: 30 days. If the customer owes any amount for longer than this period (even if the amount is less than their credit limit), you will not be able to issue another invoice until (at least) the overdue amount is paid.
-
Click on Add Customer and the customer will appear on the list above.
Note: We encourage our users to exercise caution when allowing customers to make purchases on credit. It is recommended to withhold the goods or services concerned until payment is received in full.
|
| Add inventory items |
Watch on YouTube
-
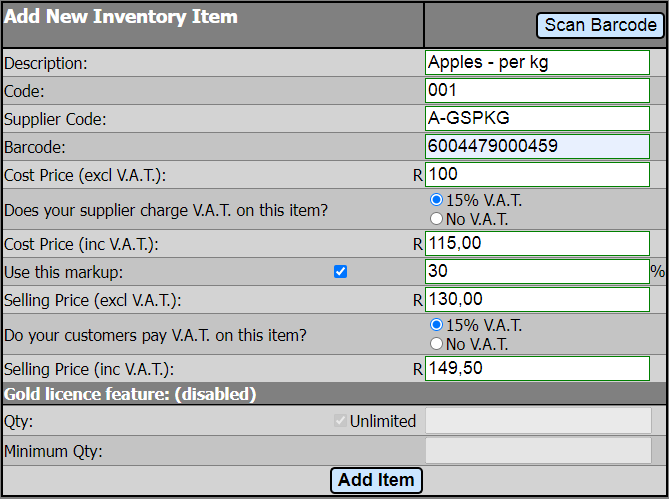
Go to Inventory and click on Add New Item. You will see the following form. The form has a different appearance depending whether your company is VAT registered. Non VAT registered companies and individuals are presented with a simpler form.
-
If you would like to capture the barcode, start by clicking on Scan Barcode. Then scan the barcode and return to the Add New Item screen. You will see the barcode number appear on the form.
-
Enter a unique description for the product.
-
Enter your product code used within your business. Or simply use the suggested code.
-
Enter the product code used by your supplier, if it has a code.
-
Enter the cost price (how much does your supplier charge) excluding VAT.
-
Specify whether your supplier adds VAT onto the price. If the supplier is not VAT registered, or if VAT does not apply to this item, select No VAT.
-
Specify whether you charge your customers VAT on this item. If your business is not VAT registered, or if VAT does not apply to this item, select No VAT.
-
Specify how much markup % must be applied to calculate the selling price. Or enter the selling price manually if you prefer.
-
(GOLD License holders) Enter your current stock quantity and minimum quantity. When this quantity is reached, more stock must be ordered.
Note that the product may be sold per unit or by mass or volume. Note that EZBeanZ allows decimal quantities on invoices. example: You invoice a customer for 500 grams of a product which is sold per kg, the quantity will be 0.5.
-
The remaining fields will auto-complete.
-
Click/tap on Add Item.
|
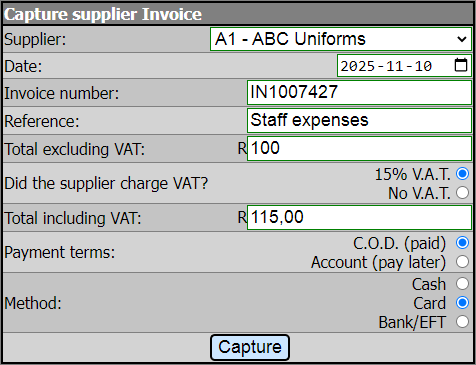
| Capture supplier invoices |
When you receive an invoice from a supplier, it should be captured into EZBeanZ in order to maintain your records.
Capturing an invoice records the expense in your accounts table and also makes an entry in your transactions table if the invoice is paid.
To capture a supplier invoice. . .
-
Go to the Supplier Invoices tab and click/tap Capture Supplier Invoice. You will see the following form. . .
-
Start by selecting a supplier from the dropdown.
-
Enter the date found on the invoice.
-
Enter the invoice number if available.
-
Provide a suitable reference. eg: Cost of sales - Cleaning
-
Enter the price and specify whether V.A.T. was charged on the invoice.
-
Specify the terms. Was the invoice paid? Or is payment due later, on account?
-
If the invoice was paid, specify the method of payment used.
-
Click/tap Capture.
Once complete. The relevant accounts will be brought up to date.
|
| Scan barcodes |
The barcode scanner uses the default camera of your device to scan barcodes. Most widely used barcode formats are supported.
To use the barcode scanner. . .
-
Go to the invoices tab.
-
Click/tap on Scan Barcodes. You may see a prompt, asking for permission to use your camera. Click/tap on Allow.
A mini-screen will appear showing the view of your camera. Here, you may also enter the desired quantity.
-
Point the camera at the barcode you would like to scan. You will hear a beep sound indicating that the barcode has been scanned. This works best with adequate lighting.
-
When you are done scanning barcodes, click/tap on Hide.
If the item is listed in your inventory, it will be placed on the current invoice along with the quantity and selling price.
If the item is not listed in your inventory, the beep is a lower tone. To add the item, go to the Inventory tab and click/tap on Add New Item.
You will find the barcode number already on the form, ready to add.
From there, you can follow the normal process to add the item to your inventory.
|
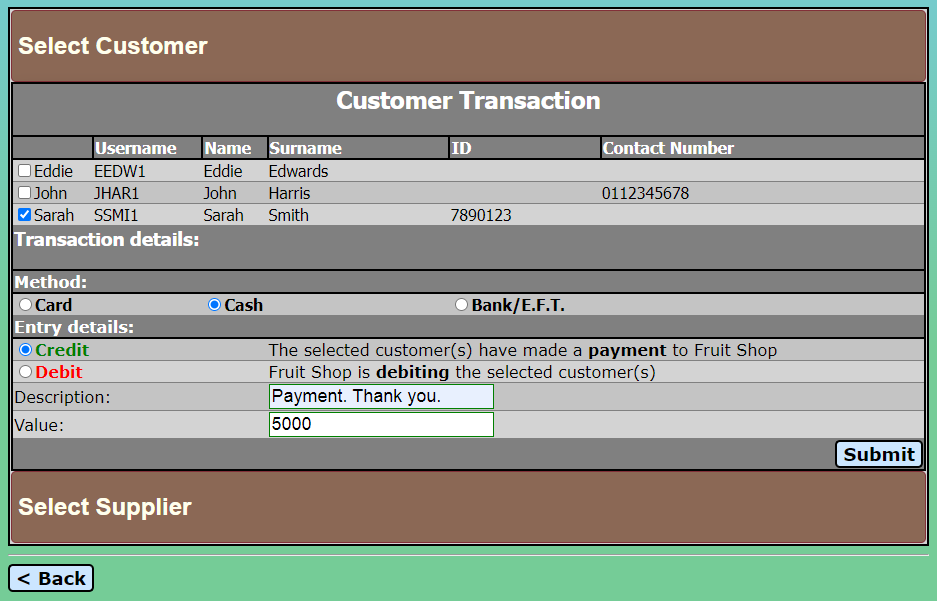
| Record account transactions |
EZBeanZ allows you to capture income and expenses to keep your customer accounts as well as supplier accounts up to date.
By maintaining your transactions table, you will know exactly how much you owe your suppliers and how much your customers owe you.
Before you capture any transactions, take note that EZBeanZ captures most payments automatically.
However, this feature allows you to record a payment manually.
eg: When a customer pays their account with cash, this needs to be captured into EZBeanZ. When you capture the payment, the customer's account balance will be updated.
The same applies to transactions with your suppliers. If you owe money to a supplier, and you make a payment to that supplier, the transaction must be recorded in EZBeanZ in order to reflect the new amount owing.
This feature is not for C.O.D. transactions, only payments on accounts.
To capture a transaction. . .
-
Go to the Transactions table on your dashboard.
-
Before proceeding, check to see if the transaction is already on the list. If the payment was electronic, it may have been captured automatically. Take care not to create duplicates.
-
At the bottom, select New Entry.
-
Is the transaction with a supplier or with a customer? Select the relevant tab and select at least one customer or supplier from the list.
-
Specify the payment method used.
-
Select Debit or Credit.
eg: If you received a payment from a customer, select the customer and select Credit.
eg: If you paid a supplier, select the supplier and select Debit.
-
Provide a description. This will appear in your transactions table as a reference. And also on statements sent to the customer.
-
Specify the payment amount.
-
Click/tap Submit.
An entry will be made in the transactions table and also in the accounts table. Double-check by selecting the customer or supplier in the Accounts table. The new balance will reflect.
|
| Print reports |
|---|
Watch on YouTube
-
To print a basic sales report, click on the Invoices tab and then click on previous invoices. At the bottom of the page, you will find a form where you can select the start and end date and time.
-
Select the date and time to start from, the default end date and time will be the present.
-
Make sure your printer is switched on, has paper, and is paired/connected to your smartphone or PC, then click/tap on Print Sales History - A4 or Print Sales History - 58mm till slip as required.
Further instructions on how to connect a printer to EZBeanZ can be found under Settings.
|